概要
- 「主要なモーフの配置について」を理解した上で、スクラッチの画面のレイアウトを変更します。
- 具体的にはスクラッチ2.0のように、ステージが左に、スクリプトが右になるように配置を変えます。
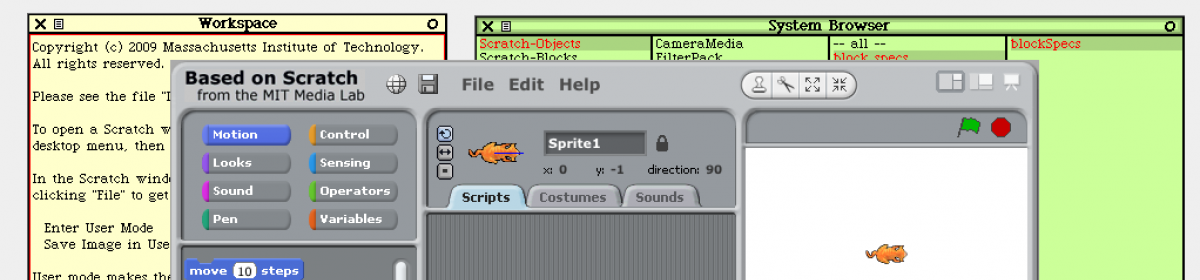
Scratch Source Code Licensed Codeの画面は以下のようになっています。

一方でScratch 2.0の画面は以下のようです。

Scratch 2.0のレイアウト上の大きな違いは、ステージが左に、スクリプトが右になっていることです。更に細かく言えば、カテゴリやブロックとスクリプトとが一体化していたり、コスチュームも右半分のエリアを使うようになっています。
全く同じようなレイアウト構成にするのは難しいので、ここでは単にステージやスクリプトのレイアウトをScratch 2.0風に置き換えるように改造しましょう。
改造の方針
スクラッチの画面は大きく5つのモーフ(topPane, viewerPane, scriptsPane, stageFrame, libraryPane)に分かれていました。
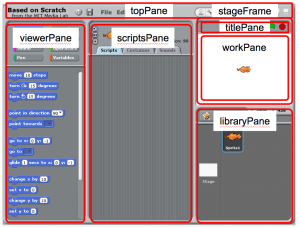
このうち、topPaneは移動させず、stageFrame とlibraryPane を左側に、scriptsPane を右側に、そしてviewePane を中央に配置しなおします。
最後にレイアウトを変えることで生じる不具合を調整します。
fixLayout メソッドの変更
スクラッチの画面全体のレイアウトは、ScratchFrameMorph クラスのfixLayout メソッドが調整しています。
メソッド内では、stageFrame, viewerPane, scriptsPane, libraryPane の順に設定を行っています。先に設定した情報を後で使う場合があるので、この順にレイアウトを変えていくことにします。
stageFrame の配置
stageFrame
  extent: stageExtent + (14@42);
  top: topPane bottom;
  right: self right.
まず、stageFrame は左側に配置したいので、上のコードを以下のように変更します。
stageFrame
  extent: stageExtent + (14@42);
  position: topPane bottomLeft.
top: と right: で設定されていた箇所を、viewePane の位置設定に使われていたposition: の設定に変えています。
viewerPane の配置
viewerPane position: topPane bottomLeft;
  width: w;
  height: self bottom - topPane bottom.
カテゴリとブロックを含むviewerPane は、stageFrame の右隣に配置するように変更します。
viewerPane position: stageFrame topRight;
  width: w;
  height: self bottom - topPane bottom.
scriptsPane の配置
scriptsPane
  position: viewerPane topRight;
  width: self width - (stageFrame width + viewerPane width);
  height: self bottom - topPane bottom;
  fixLayout.
scriptsPane は、viewerPane の右隣に配置されるようになっていますが、この関係は変わらないので特に変更する必要はありません。
libraryPane の配置
libraryPane position: stageFrame bottomLeft;
  width: (self right - scriptsPane right);
  height: self bottom - libraryPane top.
libraryPane の位置はstageFrame の下にあるので、上のままで良いのですが、幅の指定がScratchStageMorph の右端からscriptsPane の右端までの長さとなっているため、このままだと幅=0px となり表示されません。
そこで、width: で設定する値を以下のように変更します。これにより、幅が viewerPane の左端からScratchFrameMorph の左端までの長さとなります。
libraryPane position: stageFrame bottomLeft;
  width: (viewerPane left - self left);
  height: self bottom - libraryPane top.
ちょっとした微調整
表示モードを切り替えるviewModeButtonsPanel と、コピーや切り取りを行うtoolbarPanel は、いずれもstageFrame に合わせて配置されますが、stageFrame が左側に来たことでメニューなどと重なってしまいます。そこで、右の方に移動させます。
viewModeButtonsPanel
  right: stageFrame right - 8;
  top: self top + 7.
右端がstageFrame の右端に揃えられているので、scriptsPane の右端に揃えるようにします。
viewModeButtonsPanel
  right: scriptsPane right - 8;
  top: self top + 7.
toolbarPanel
  left: (stageFrame left - 4 max: menuPanel right);
  top: self top + ((topPane height - toolbarPanel height) // 2) + 3.
左端がstageFrame の左端(またはメニューの右端)になっているので、viewerPane の左端に移します。
toolbarPanel
  left: (viewerPane left - 4 max: menuPanel right);
  top: self top + ((topPane height - toolbarPanel height) // 2) + 3.
以上までの変更によってスクラッチの画面は下のようになります。

何だかおかしいですね。移動させたモーフの枠があっていません。これについては別の記事で対応することにします。